December 17, 2015
A Starry Night At White Sands + Night Photo Tips

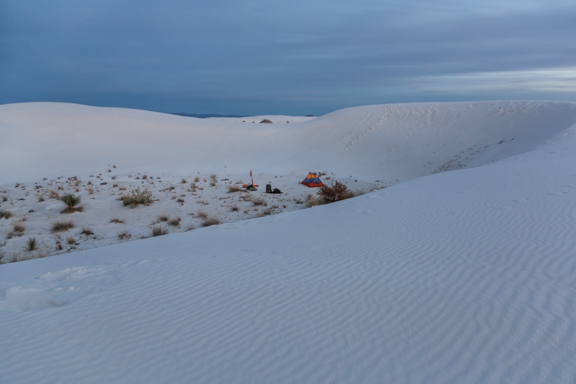
Happiness, calm, excitement, and fear…is exactly how we felt when the sun went down and we spent the night at White Sands National Monument! It was eerily cold and beautifully quiet because we so happened to pick an off season time to camp out there amongst the dunes. In fact, we only spotted one other couple earlier at the trailhead before they vanished amongst the vast landscape to their campsite far, far away from us. We were truly alone…which we greatly appreciated but also made us very alert. Now most of our night there was focused on staying warm which meant we stayed huddled together in our sleeping bags bundled up in our winter gear in the very small 2 person tent we set up before nature’s light faded. We ate dinner in that tent…we relaxed in that tent…we took in all the simple solitude in that tent, and that made us happy! Living in the city makes us tired often, so this time in the middle of nowhere with very little obligations other than to survive gave us a new found energy…it was refreshing. All we wanted to do was just unwind and of course, photograph the stars. So after dinner, we opened up our tent…the cold froze our hands immediately, and we stepped outside to view what was the most magnificent sight. The sky was filled with an amazing amount of glittering stars coupled with the sand dunes that seemed to disappear in all the darkness…and to be honest, at that moment we forgot all about the cold!
Be sure to check out our night photo tips as well as my winter parka picks for keeping you warm while camping or hiking out in the cold!
Night Photo Tips:
-
Use a tripod. The tripod is so essential because it reduces blurriness in images when you have to have your camera shutter open for a long time…that means you will have to hold it steady for up to 30 seconds. We’ve tried it without the tripod, and it never works out. Note: you can check out the tripod we like to use on our previous post about our camera gear.
-
Try to keep the ISO as low as possible. ISO on your camera is how sensitive the sensor is to light. On a lot of cameras, you can set the ISO manually which is what we would suggest to do for night photos. You want to set it low enough that it reduces noise (static looking things) in the photo but can still capture the subject perfectly.
-
Use available light sources or create your own. We always find it fun to utilize light sources in photos…so for this image, we used our headlamps to create a point of focus. I was wearing my headlamp and my husband’s headlamp was on the ground pointed at me. If we didn’t use these forms of light, you wouldn’t be able to see me…we tried. Note: we also find that reflective clothing like the jacket and boots I wore during our night photo shoot in Aspen really add another element to the photos. I wore the same jacket for this photo too.
-
Make sure your subject doesn’t move. When your shutter is open for a long time, movement causes blurriness in the scene. Sometimes that’s desired, but most of the time it’s not. So have that person or thing keep still…no blinking.
-
Experiment and take lots of photos. We’ve learned that night photography as well as photography in general is a process. For every image that we end up using, we probably take about 15 to 30 other images that we trash. Note: don’t rely on your camera’s monitor to see if a photo looks good. Especially at night, you can’t tell…so take lots of photos with slightly different settings for options.
-
Use an editing tool like Lightroom. We love using Lightroom for our editing needs especially for night photos because it is inevitable that you’ll have some static looking details on your photos that you’ll need to smooth out. When you use Lightroom, to get rid of most of that noise…all you have to do is reduce the detail and increase the luminance.
Do you have any other night photo tips? Leave a comment…we would love to hear what you think!
You might also like: